

How to make your own seed packets with recycled paper
- Kelly Joseph
- Aug 18, 2023
- 2 min read

This simple 10-minute seed project is a useful tool to have in your pocket whether you're an outdoor educator, hobby gardener, or just someone in need of a quick way to hold lots of small items.
Materials You'll Need
For this, you can use any type of paper you have access too. A few of my favorite options are:
Recycled paper
Old seed catalogs
Construction paper
Paper bags
Junk mail
Old worksheets
Wrapping paper
That's it! You just need paper. Any kind will do. You don't even need scissors if you know how to create a paper square. If you don't know how to make a paper square, don't worry, I'll show you below.
How to turn your paper into a square
To make your paper into a square, just follow these steps:
Pick one corner of the paper and fold it across and down, keeping the edges lined up so that it forms a right triangle (there should be one 90-degree corner and 2 equal length sides)
Fold the extra paper that isn't part of the triangle and trim it off either by laying it along a sharp table edge and tearing it down and off, or by trimming it off with scissors.
Now, you have a square piece of paper (leave it in a triangle for the next part)


How to make your seed packet
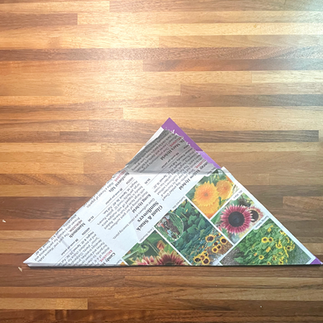
1. If you are starting with a square, fold it into a triangle by bringing opposite corners together and creasing along the bottom. Lay your paper with the triangle pointing up.

2. Grab one corner and cross it over the center. Like you're resting your hand on the opposite shoulder.

3. Do the same for the other corner. I tell the kids it's like a vampire! Laying with its arms across the body. Mimicking this with your own arms can be really helpful to explain how to do it to a group.

4. At the top, take just the front flap and tuck it into the pocket inside the top arm. This will hold the two arms in place while creating an open pocket behind them. If you ever folded paper footballs or notes in the 90s/00s this move should feel familiar (lol).

5. Your seed packet is now ready for seeds.

6. Once your seed packet is filled, you can now fold the other top flap and tuck it into the same place you put your first flap. This will close your seeds into your packet. If you want to really seal it, you can add a piece of tape so that it stays closed for long term storage. Don't forget to label your seed packets!

Now that you know how to make your own seed packets, why not host a seed swap or a free seed market? Check out my other guides for ideas!
How to Save your Own Seeds for next year's garden

Comentários